SEO snapshot
| Element | Value |
|---|---|
| Focus keyphrase | bridal detail flat lays |
| SEO title | Mastering Bridal Detail Flat Lays: Tips From a Pro Photographer |
| Slug | bridal-detail-flat-lays |
| Meta description | Learn pro styling tricks—from choosing backdrops to balancing color—to create bridal detail flat lays that elevate your wedding gallery and wow publication editors. |
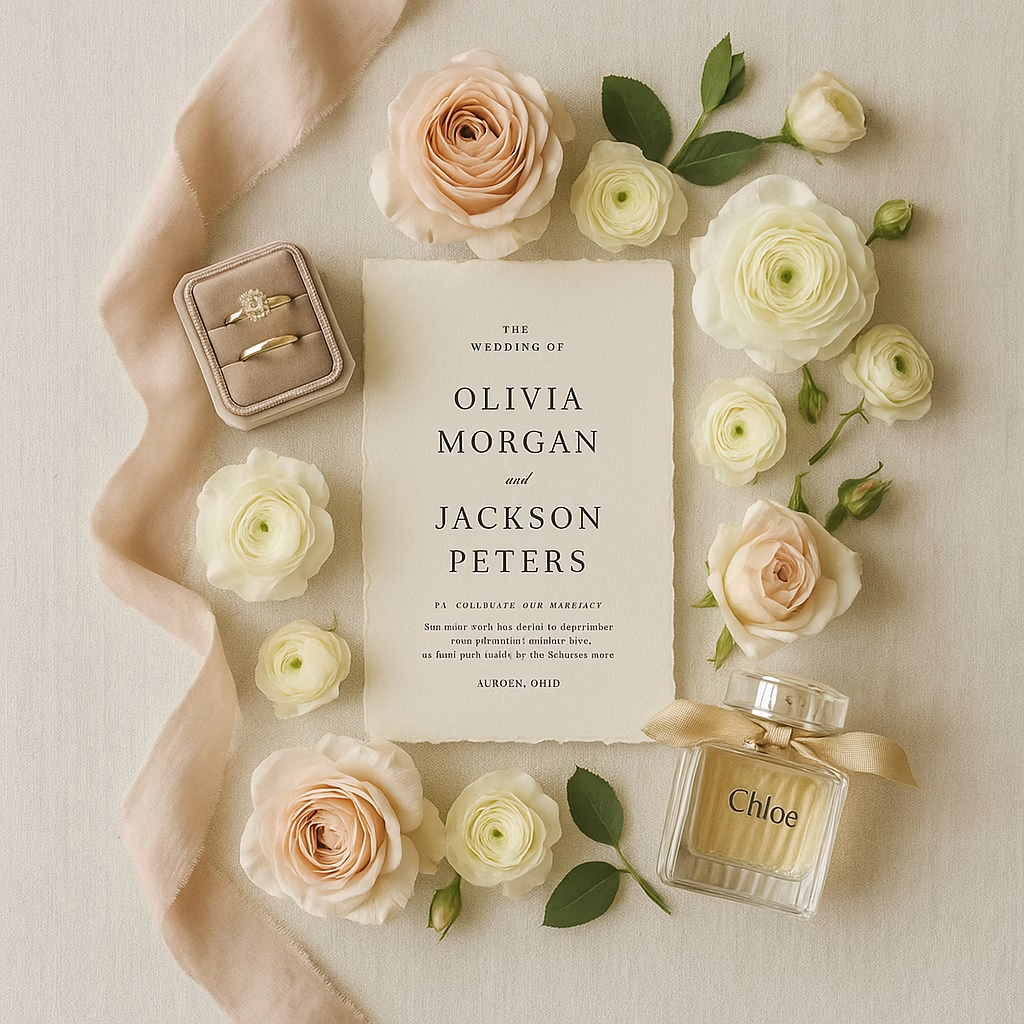
Those dreamy invitation-suite photos you see in magazines don’t happen by accident. Bridal detail flat lays are carefully styled vignettes that set the tone for your entire gallery and tell a mini-story of the day before any portraits appear. Here’s how I build editorial-ready flat lays—plus simple tweaks you (or your planner) can use to level-up yours.
1. Start With a Clean, Neutral Backdrop
A linen styling board, handmade paper, or even a sheet of matte art paper keeps attention on the details instead of busy hotel-room carpet. I carry two boards—one light, one dark—to match every color palette.
Pro tip
If your colors are bold (hello jewel tones!), a warm gray board bridges the hues without making them fight for the spotlight.
2. Gather Everything Before You Begin
Save time by boxing up these essentials the night before:
- Full invitation suite + envelopes
- Both rings & ring boxes
- Vow books or letters
- Jewelry, perfume, cufflinks
- Decorative stamps or wax seals
- Loose florals from the florist (ask for extras!)
Having everything at hand prevents the start-and-stop scramble that eats into the portrait schedule. (Need help planning that timeline? Peek at my Ultimate Wedding Photography Timeline guide.)
3. Layer From Largest to Smallest
- Foundation – invitation envelope or vow book
- Mid-size – RSVP card, ring box, perfume bottle
- Smalls & Texture – loose blooms, ribbon, stamps, wax seals
This “big-to-tiny” order keeps the frame balanced and lets the eye travel naturally.
4. Use the Rule of Odds
Groups of three or five create visual harmony. For example, place three ranunculus blooms at different angles beside a trio of vintage stamps to echo the invitation’s floral motif.
5. Mind Your Light
Natural window light at a 45° angle gives soft shadows that reveal texture without harsh contrast. If you’re stuck in a dim getting-ready room, a portable LED panel bounced off a white foam board mimics that window glow.
6. Tell a Cohesive Story
Choose props that relate: vintage stamps for a historic venue, or lake-blue silk ribbon for a shoreline ceremony. Random add-ins dilute the narrative and feel more like clutter than curation.
7. Keep a Styling Emergency Kit
- Museum putty (so rings don’t roll)
- Fishing line (to “float” earrings)
- Straight pins (lift cards to add dimension)
- Microfiber cloth (smudge-free shine)
- Small paint-brush (sweep away petal dust)
8. Edit With Publication in Mind
Leave negative space at one edge for editors to overlay text. Shoot both horizontal and vertical orientations so your gallery—and any future feature—has options.
9. Finish With a Flat-Lay “Portrait”
Hold the bouquet or shoes just outside the flat lay and blur them into the foreground for a dynamic, three-dimensional feel. It’s an easy way to tie bridal details back to the larger day.
10. Practice Makes Perfect
Flat-lay styling is an art. Spend a rainy afternoon arranging thrift-shop paper goods and faux florals—you’ll refine your eye for balance long before wedding-day pressure kicks in.
Ready for Magazine-Worthy Details?
Browse more editorial styling inspiration in my Weddings portfolio, then get in touch to chat about elevating your bridal details from simple snapshots to frame-worthy art.


